I've written before about my love of tropical nightshade-free starchy roots and tubers. If you can get your hands on malanga, taro, or yuca, you won't miss potatoes! I've got a recipe for how to make a mashed potato substitute out of any of these, which is great as a side dish or as a topping for shepherd's pie.
Today, I'd like to share a traditional Cuban preparation for yuca, simply called yuca con mojo, yuca with "sauce". Last week I posted a recipe for the delicious sour orange + garlic marinade/dressing known as mojo criollo, which is exactly what you use to bathe the boiled, tender, yuca for this delightful dish!
And just as an FYI: yuca, cassava, manioc, and tapioca are all the same thing. But not yucca -- that's a shrub related to agave :)
Yuca and Cyanide Intoxication
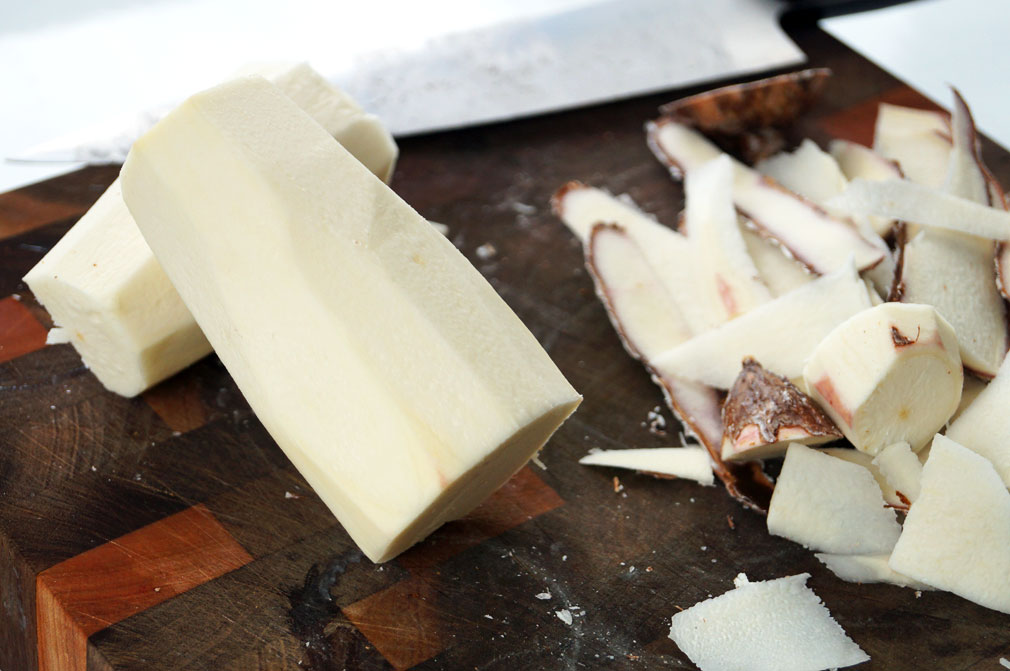
I've written about yuca and cyanide before, but this is important, so I'm going to restate it: you can get cyanide intoxication from improperly prepared yuca thanks to the hydrocyanic acid (HCN) which is present throughout the root. When working with whole yuca, it is very important that you not only remove the tough brown outer peel, but also the purplish layer immediately underneath (see photos). Most of the HCN is concentrated around the peel and in the purplish area. Boiling for 20-25 minutes will help degrade what remains throughout the remainder of the root. You can read more info on all of this here.
Fresh vs. Frozen Yuca
I rarely ever work with fresh yuca -- I always buy it frozen. I remember when my Puerto Rican mother-in-law told me never to buy fresh yuca, I brushed it off. I think most of us have a tendency to believe that fresh produce is always better than frozen, but that's not always the case, especially for yuca!
- The "fresh" yuca isn't actually very fresh and is coated with difficult-to-remove paraffin wax. Yuca begins to deteriorate very quickly after harvest. For the whole roots to make it to your grocery store without rotting during the journey, they must be coated in a thick layer of petroleum-derived paraffin wax. I don't care if it's "food-grade," I don't want to ingest any petroleum products! When you are peeling the skin with your knife, some of the wax will stick to your knife and cutting board and will contaminate your white yuca flesh. Blech! It's also a real pain to clean off of your knife and cutting board.
- Frozen yuca is actually fresher than "fresh" yuca. Since yuca is so fragile and doesn't hold up to travel all that well, it makes sense to freeze it immediately after harvesting. So, that's what exporters do: peel it and then flash-freeze it right away. Sometimes it will even come with the woody center removed, too. Not having to peel the roots will save you time and frustration. It also prevents any nasty paraffin wax from ever coming in contact with your yuca!
- You can use 100% of the frozen yuca that you buy. As we've established, yuca doesn't travel well or store well as a "fresh" root. Realistically, you should account for about a 25% waste of "fresh" yuca. It's super common to cut into a piece of yuca once you get it home only to find that a large portion of the root is spoiled and must be discarded. You need to cut a wide berth around any blemishes or dark patches running through yuca and also remove any soft or mushy portions. I almost never find a whole yuca root that is 100% usable. A bag of frozen yuca, on the other hand, only contains clean, white, usable pieces of yuca. There's absolutely no waste involved.
- Frozen yuca is more cost-effective than "fresh". Prepping fresh yuca takes time. Time is money. Cleaning up the wax from your knife and cutting board is also time-consuming and just downright unpleasant. And, since an average of about 25% of any fresh yuca purchase is actually wasted, buying frozen costs less money. Heck, I can find a 5 lb bag of frozen yuca for $3.99. "Fresh" roots usually cost about $0.99/lb. Even before accounting for the loss of weight due to peeling, frozen is a better deal!
Bottom line: seek out frozen yuca and avoid purchasing "fresh" roots if at all possible!
I can't speak for the whole US, but in South Florida you can find frozen yuca in any grocery store, large or small. When I lived in Georgia, I could find it at Latin American markets. You may also be able to find it at Asian markets, too. Also, if you have any sort of international supermarket near you, they should carry it frozen.
Boiling Fresh Yuca
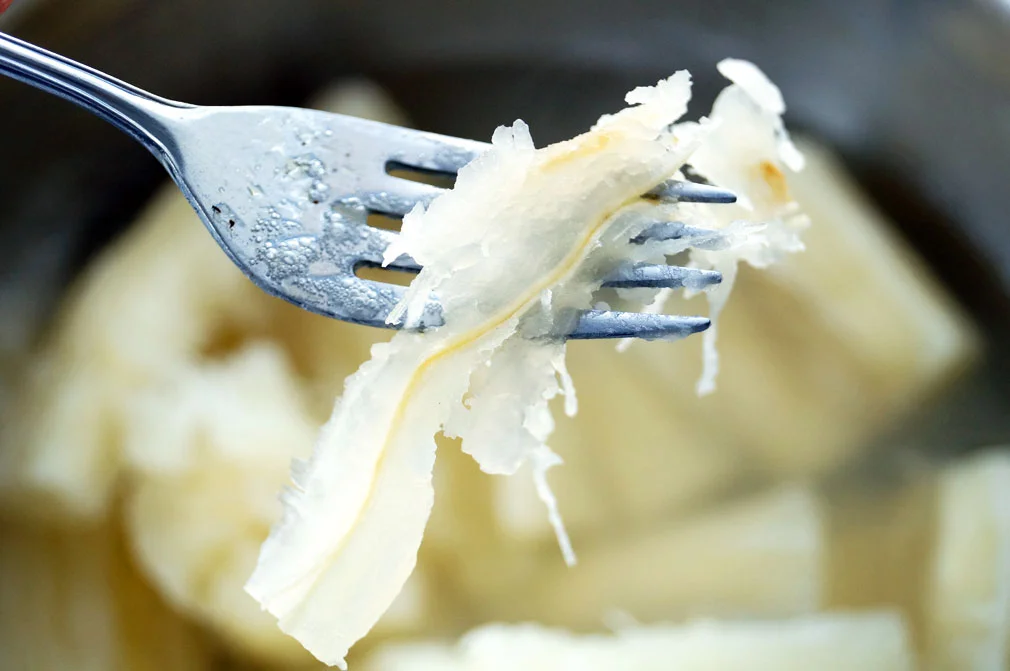
If you end up working with fresh yuca, just be sure to peel it well (as described above) and also be on the lookout for the inedible, tough, fibrous, stringy core that is easily removed after boiling. Here's what you are looking for:
How to Use Leftover Yuca
Leftover boiled yuca can't really be reheated -- the starch starts to seep out and if you try to re-boil it, it will just turn into a sticky mess. So if you do have extra, you'll want to mash it up into little cakes and fry 'em up. They taste wonderful with the mojo criollo and onions mixed in! I'll show you how to do it at the end of the recipe.
Cuban-Style Yuca con Mojo + Fried Yuca Patties
Yuca con mojo is a traditional Cuban side dish that makes a great nightshade-free, low FODMAP potato substitute!
Prep time: 15 minutes
Cook time: 20-25 minutes
Total time: 35-40 minutes
Ingredients
- 2 lbs fresh yuca or about 1.5 lbs frozen
- filtered water, for boiling
- juice of 1 lime
- 1/2 tsp unrefined salt
- 1/2 - 1 cup mojo criollo sauce (with oil included) -- see note in recipe for substitute
- 1 small white or yellow onion, sliced into rings
Cooking Directions
- If using fresh yuca, peel root with a knife. Begin by cutting off both ends. Then, cut root in half and place the flat cut edge against the cutting board. Use your knife to cut downward toward the board to remove the skin. Be certain to remove all traces of the pink/purple layer that is just beneath the skin as this is where the toxins are most highly concentrated. Cut peeled yuca into sections about 3 inches long.
- Add water, lime juice, and salt to a pot and bring to a boil. Carefully add yuca pieces and allow to return to a bubble then reduce heat. Let it cook uncovered for 20-30 minutes, or until easily pierced with a fork. As it cooks, the pieces will expand and some will crack open along the center.
- While yuca is cooking, slice onion into thin rings.
- When you have about 5 minutes left to cook the yuca, begin preparing the mojo sauce. Pour sauce into a large frying pan with onion rings and allow to come to a gentle bubble to soften onions and gently cook the garlic. NOTE: If you don't have pre-made mojo or don't have access to sour oranges, you can use lime juice only in this recipe. Use the juice of about 4 limes, a few Tbsp of olive oil, 4-6 cloves of garlic (minced or pressed), and a generous pinch of salt, oregano, and ground black pepper to taste.
- Once yuca finishes cooking, be sure to remove the tough, stringy, fibrous core from each piece. There is NOTHING worse than biting into one of those while eating yuca. I usually just fish out each piece of yuca individually with a fork, remove the core, then add it to the frying pan one piece at a time.
- Add all of the cooked, cleaned yuca to the frying pan and toss to combine with the sauce. Let the flavors mingle for about 3-5 minutes, stirring a few times. The sauce will thicken during this time as some of the starch from the yuca cooks out. You will want to serve immediately as the texture will change as the yuca sits and cools. If you have leftovers, store them in the fridge in an airtight container.
- To reheat leftovers, you will need to mash the yuca and form it into patties to be fried. Use a potato masher to thoroughly mash chilled yuca into a creamy consistsency. If you have very large onion pieces, you may want to pull them out and chop them up into smaller pieces. Incorporate the onions into the mash. Use your hands to pinch off pieces of the mashed yuca and roll it into a ball about the size of a nectarine or plum and then flatten into a disc.
- Heat a few Tbsp of lard or bacon fat over medium heat for several minutes to get it nice and hot. Then, add yuca patties to oil, being careful not to crowd them in the pan. Work in batches if necessary.
- Fry several minutes on each side, until browned and crispy. Serve and enjoy!!
Recommended Tools and Ingredients
This post contains affiliate links for things that I use in my own kitchen and believe you will enjoy, too. My full affiliate disclosure is here. Thanks for your support! :-)


